'%20stroke='%23225779'%20stroke-width='0.7'/%3e%3cpath%20fill='url(%23zr-ink)'%20fill-rule='evenodd'%20d='M51%2065H124C138%2065%20146%2073%20146%2086C146%2095%20143%20102%20136%20106C138%20113%20142%20119%20145%20126C140%20127%20135.5%20128.2%20131%20129L121%20108H113V121C113%20129%20111%20133%20103%20133H51V122L79%2079H51Z%20M97%2079H99V120H70Z%20M113%2079V96H124.5C130%2096%20132%2092%20132%2087C132%2082%20129.5%2079%20124.5%2079Z'%20transform='translate(-16%20-20)'/%3e%3ccircle%20cx='129'%20cy='130'%20r='10'%20fill='%23007bff'/%3e%3c/svg%3e)
Open Main → Settings. Below, we go through the window’s five panels: general settings on the left, the radar map and list at the top, followed by the target list and target panel at the bottom. Within each panel, settings are described from top to bottom, as they appear in the program.
The checkboxes in the headings Radar map, Radar list, Target list and Target panel independently enable the corresponding elements on the game screen.
General settings
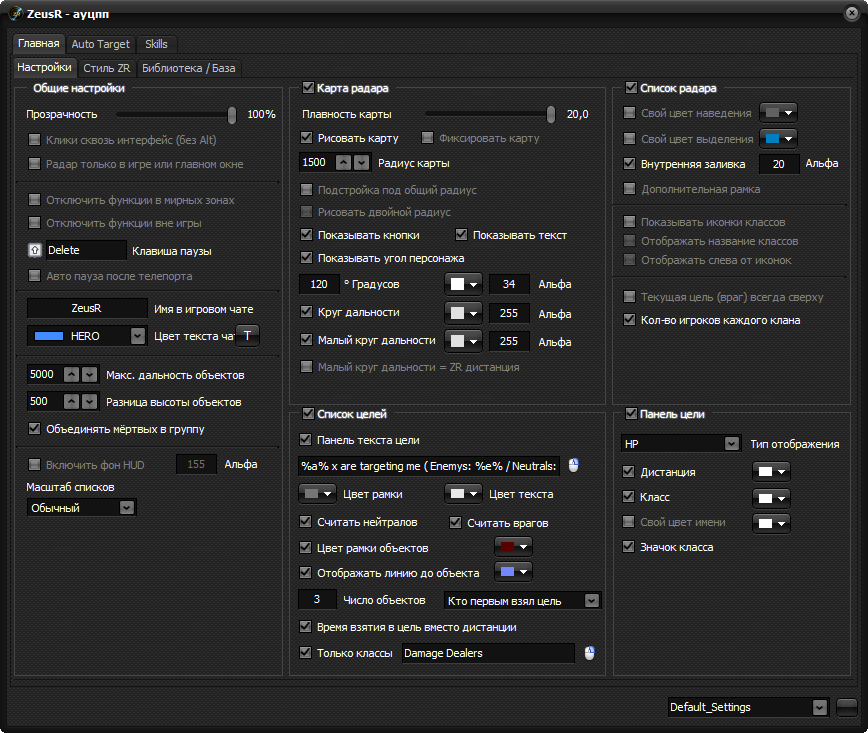
Surroundings, panel visibility, and general ZeusR operation settings.
The left column controls the entire interface: visibility, controls, status messages, and the overall view of objects.
Opacity. Adjusts the visibility of the ZeusR interface from 25–100%. Background image opacity is set separately below in the “Alpha” field.
Click through the interface (without Alt). Clicks pass through the ZeusR overlay to the game beneath it. Hold Alt to interact with the radar or its panels.
Radar only in the game or main window. Hides the overlay when you switch to other applications. This setting controls visibility; the following checkboxes control when automatic functions stop.
Disable functions in peace zones. Suspends automatic operation while your character is in a peace zone. Peace zones are detected automatically.
Disable functions outside the game. Suspends automatic actions when the game window is inactive. The interface may remain visible if hiding it is not enabled.
Pause key. Sets the global pause key. Delete is selected in the screenshot; your configuration may use another key. Global pause stops automatic operation until you release it.
Auto-pause after teleport. Activates global pause after your own teleport. When you are ready to continue, release it with the assigned key.
In-game chat name. The sender name for the plugin’s status messages, such as ZeusR.
Chat text color. Selects the style of these messages. HERO in the screenshot sets how they look in your client; status messages are not sent to other players (only you see them). The “T” button beside it displays a test message to check the name and color.
Max. object range. Limits the overall view of your surroundings. It determines how far away ZeusR considers objects; the map’s own radius and Auto Target range are set separately.
Object height difference. Limits the allowed height difference between you and an object. Useful in areas with multiple floors: too large a tolerance includes players on other levels. Adjust the value in the game; zero should not be assumed to mean unrestricted in every case.
Group dead objects. Collects dead objects into a separate group so they take up less space in the list.
Enable HUD background. Enables background images for the radar, lists, and target panel. The “Alpha” field beside it changes opacity: a lower value makes the background more transparent, while a higher value makes it more opaque.
The images are stored in the data\Images\Huds folder inside the ZeusR folder. You can replace them with your own PNG files, including images with transparency, while keeping these filenames:
RadarMapHud.png— radar background when “Draw map” is off;RadarListHud.png— radar list background;TargetMeHud.png— target list background;TargetHud.png— selected target panel background.
Each image stretches to the width and height of its panel and adjusts when the panel is resized. After replacing the files, turn the HUD background off and back on to load the new images.
List scaling. Selects normal, enlarged, or extra-large lists. Start with this setting if names and distances are hard to read at high resolutions.
Radar map
Map coverage and orientation, with guides for judging direction and distance.
The upper middle panel controls the : its coverage, terrain background, and guides around your character.
Map smoothing. Changes how the map updates when moving and turning. Choose a value that makes markers comfortable to track.
Draw map. Shows a background using maps of the game world. The area is selected automatically based on your character’s position. Maps are stored in PNG format in the data\Images\Maps folder inside the ZeusR folder.
You can change map colors, brightness, and contrast in an image editor. Save the files as PNGs with their original names, dimensions, and landmark positions. After replacing them, turn “Draw map” off and back on to reload the images.
Lock map. Changes the orientation mode when your character turns. It is easiest to compare modes while standing still: turn your character and watch how landmarks move on the map.
Map radius. Sets the area of your surroundings shown, from 100–2500. A larger radius fits more terrain; a smaller one helps you examine nearby objects.
Match overall radius. Links map coverage to the current working range of the ZeusR profile. When enabled, the separate radius adjustment buttons are unavailable.
Draw double radius. Expands coverage when matching the overall radius is enabled. Use this for an additional view around the main working area.
Show buttons. Displays “+” and “−” on the map to change its coverage. They work when the radius is set independently of the overall range.
Show text. Displays a numeric range label on the map.
Show character angle. Enables the facing direction sector. Its width in degrees, color, and “Alpha” are set below. This is a visual guide; the Auto Target selection angle is configured in its own profile.
Range ring. Shows the main ring around your character. Its color and opacity are set beside the checkbox.
Small range ring. Enables an additional ring with its own color and opacity.
Small range ring = ZR distance. Links the additional ring to the current distance of the ZeusR profile so you can see its boundary on the map.
Radar list
Choose which details about nearby players to show in list rows.
The upper right panel styles — rows for nearby players and objects. It is easier to find a name here when map markers are clustered too tightly. Left-clicking a row attempts to select the object in the game.
Inner fill. Adds color inside the row; the “Alpha” field beside it changes its opacity.
Additional border. Enables an additional outline for row highlighting.
Class icons and names. You can show class icons, text names, or both. “Display to the left of icons” sets which side the class text appears on.
Current target (enemy) always on top. Helps you keep track of a selected enemy in a long list: among players with the same priority, the target appears first. Enemies with higher priority remain above it. The rule applies to enemies within the working range.
Player count for each clan. Shows how many characters from a clan are visible nearby beside its name. For example, (4) Clan name means four characters from that clan are visible nearby. The count includes characters hidden from the list itself. If there is only one character, no number is shown.
For a larger list, start with scaling in general settings, then decide whether you need both class icons and names. More detailed object color and label settings are available in ZR Style.
Target list
Choose which details to show about players targeting you.
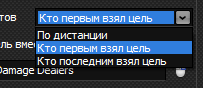
The order of players in the list of those targeting you.
This panel configures the , who have selected you as their target.
Target text panel. Enables a summary row above the list. In the field below, you can write your own text with placeholders: %a% — total enemies and neutrals included, %e% — enemies, %n% — neutrals. For example, Targeting you: %a% · Enemies: %e% · Neutrals: %n%.
Border and text color. The two fields below the template style the summary panel separately.
Count neutrals and enemies. These checkboxes include or exclude neutrals and enemies from both the list and the count. You can keep only enemies, only neutrals, or both categories.
Object border color. Sets the common highlight color for object rows in this list.
Display line to object. Connects your character to the corresponding object on the map. Choose the line color beside the setting.
Number of objects. Sets the maximum number of list rows. The screenshot uses 3; if you set it to 5, the panel automatically grows taller and can show up to five players targeting you.
Sorting. The dropdown beside the object count offers three orders:
- By distance — nearest objects first.
- First to target you — players who selected your character earlier come first.
- Last to target you — players who selected you most recently come first.
Time targeting you instead of distance. Replaces the distance in each row with how long the player has been targeting you. The sort order is still set separately in the dropdown above.
Only classes. Limits the list to selected classes. Enter them in the field separated by commas, or specify a group from the library. The screenshot uses the Damage Dealers group.
Target panel
Choose which details to show about your selected target.
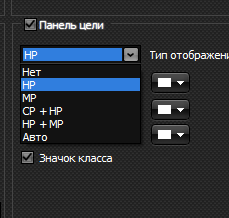
Choose which resource bars to show in the target panel.
This configures the with information about your selected target: name, resource bars, and additional labels.
Display type. Selects the set of bars. The expanded menu in the screenshot offers:
| Mode | What is displayed |
|---|---|
| None | Panel without resource bars |
| HP | Health |
| MP | Mana |
| CP + HP | CP and health |
| HP + MP | Health and mana |
| Auto | Automatic display selection |
Exact health values are not available on every server and may not be displayed. Other details also depend on the data available for the selected object.
Distance. Adds the distance to the target; choose this label’s color on the right.
Class. Adds the class name as text with its own color. Names can be added and changed in the library ZeusR.
Custom name color. Replaces the name color from style rules with the color selected here.
Class icon. Shows the class icon beside the target’s information.