'%20stroke='%23225779'%20stroke-width='0.7'/%3e%3cpath%20fill='url(%23zr-ink)'%20fill-rule='evenodd'%20d='M51%2065H124C138%2065%20146%2073%20146%2086C146%2095%20143%20102%20136%20106C138%20113%20142%20119%20145%20126C140%20127%20135.5%20128.2%20131%20129L121%20108H113V121C113%20129%20111%20133%20103%20133H51V122L79%2079H51Z%20M97%2079H99V120H70Z%20M113%2079V96H124.5C130%2096%20132%2092%20132%2087C132%2082%20129.5%2079%20124.5%2079Z'%20transform='translate(-16%20-20)'/%3e%3ccircle%20cx='129'%20cy='130'%20r='10'%20fill='%23007bff'/%3e%3c/svg%3e)
In-game radar
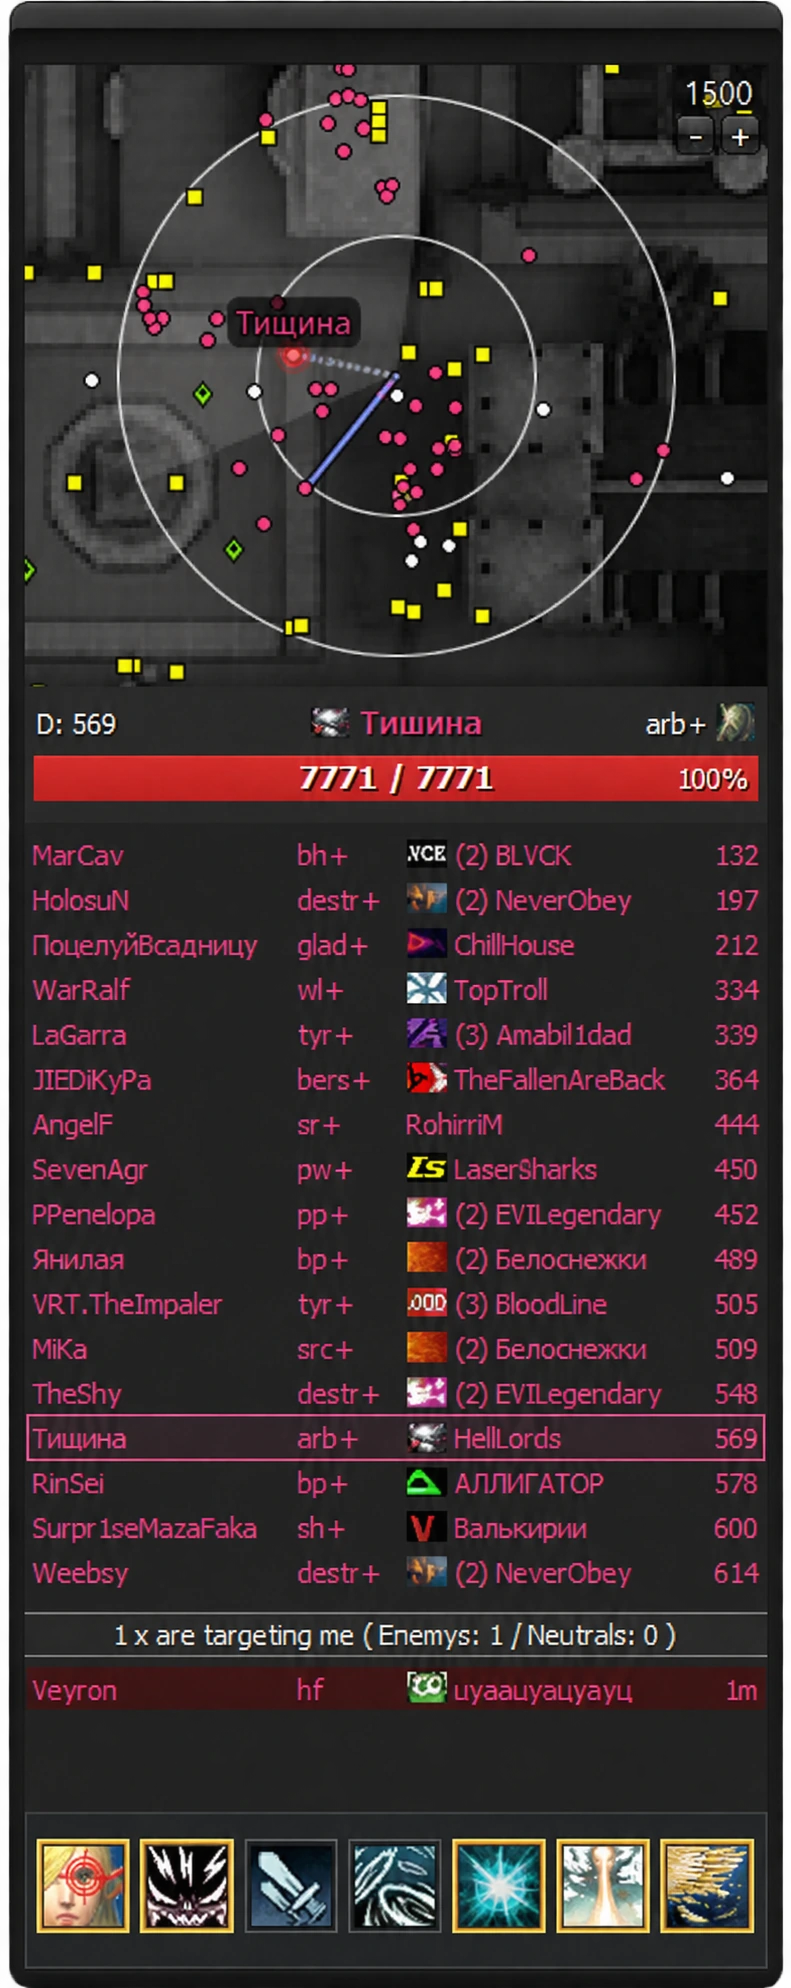
The map helps you judge the direction and distance to objects.
- Your character at the center of the map
- The selected target with its name label
- Your character’s direction arrow
- Range rings
The ZeusR radar helps you see your surroundings and track your selected target without searching for each player on the game screen. It combines a map with object markers, a list of nearby players, a current target panel, and a list of players targeting your character.
Your character is the reference point. Its position is marked at the center of the map, with surrounding objects positioned relative to it. The radar lets you quickly see which direction a player is in, how close they are, and how their position changes as they move.
The map and lists complement each other. The map shows the relative positions of objects, the list helps you find a particular name in a dense cluster of markers, and the target panel displays information about the selected character. Players’ positions and distances change as they move; the list contents depend on the surroundings currently available to ZeusR and the display settings.
You can customize the radar’s appearance: turn individual panels on or off and adjust colors, labels, and icons to suit your needs. It is therefore easier to learn the interface by what its elements do, rather than just their color or position in a particular screenshot.
Markers, direction, and range
Character arrow. Marks your character and provides a reference for reading the map. Judge the positions of other markers relative to it. How the display responds to turning depends on the selected map orientation mode.
Object markers. Show players and other displayed objects around you. Their shape, color, size, and label help distinguish them according to the style rules. The name above a marker connects the object on the map to its list entry. Color meanings and available labels are determined by the settings in ZR Style: the same color should not be treated as a permanent indication of an enemy or ally.
Terrain background. Helps you relate object positions to paths and other landmarks in the area. Markers and terrain imagery are separate layers: if the current area’s map is unavailable or its rendering is disabled, that alone does not mean there are no objects nearby.
Direction sector. Shows your character’s facing direction and a specified angle in front of them. Its width, color, and opacity are adjustable. This is a visual guide; the angle Auto Target uses to select targets is set in its own settings. Changing the sector on the map does not by itself change the automatic selection rules.
Range rings. Help you judge distances relative to the center and working area. The map coverage determines how much of your surroundings fits on the radar. Changing the zoom can make markers look closer to or farther from the center even though the actual distance to the object has not changed. The numeric distance in the list or target panel gives a more precise position.
Settings for zoom, orientation, smoothing, terrain background, and rings are available under Main → Settings. It is important to distinguish three things here: your character’s direction, the visible map area, and the area where automatic target selection is allowed.
Target selection, HP, and player lists
The panels show your target, nearby players, and those targeting you.
Target selection. Left-clicking a map marker or a Radar List entry attempts to select the corresponding object in the game. Highlighting helps you find it among the other markers, and the target panel shows its information. Manually selecting an object and running Auto Target are separate actions: a click alone does not enable automatic searching or attacking.
Radar List — nearby players and objects. Lets you select an object by name when the map has many markers or they overlap. A row may display:
- name — the name used to find a particular player;
- class — the class icon and text label, if enabled;
- clan — the clan name and available clan crest;
- distance — the current distance from your character to the object.
The rows update as the available surroundings change. Their order depends on settings and priorities: the first player in the list is not necessarily the closest. Hovered and selected rows can have separate highlights. An object’s presence in the list also does not mean it meets the conditions for automatic target selection.
Target HUD — your current target. Collects information about the selected object in a separate panel: name, distance, class, and available resources. The clan crest and class icon serve different purposes: the former identifies the player’s affiliation, the latter their class.
When HP is displayed, the bar and numbers refer to the selected target’s health. A value such as 8 706 / 8 706 shows the current and maximum values, while 100% — the proportion of health remaining. As HP changes, so do the bar’s fill and the available numeric information. Exact HP values are not available on every server and may not be displayed. Settings also offer MP, CP/HP and HP/MP combinations, automatic mode, and an option without bars. The data shown depends on the selected mode and the information available for that object.
Target List — who is targeting you. Shows the other side of target selection: who has selected your character, rather than whom you have selected. This separate list helps you notice attention directed at you. If the relevant lines and highlights are enabled, the connection is also visible on the map and in the objects’ styling. Being selected as a target does not by itself prove that a player is attacking.
For this list, you can include enemies and neutrals, limit the number of rows, and filter classes. Depending on the setting, the right column can show either distance or how long the player has been targeting you. The summary row counts the objects included in the list, rather than all players on the server. Detailed options are in the “Target List — who is targeting you” section on the interface settings page.
Function bar and controls
Quickly enable ZeusR functions and control the global pause.
The function bar lets you enable the modes you need without opening settings every time:
- Auto Target — automatically searches for and selects a target according to specified conditions;
- Target Inspector — remembers, restores, and retains the selected target;
- Auto Assist — works with the selected assister’s target;
- Smart Combat — performs configured actions when the conditions are met;
- Breaker — responds to observed casts;
- Reskill — acts when resurrection detection conditions are met;
- Noblesse — checks for and casts Noblesse on yourself.
The button allows the mode to run. For functions that use rules, first prepare the settings on the corresponding tab: enabling the button does not replace the action list, conditions, and filters.
Enabling functions. Left-click an icon to turn its function on or off. The gear in the bar’s expandable area opens the settings window.
Icon order. Hold the right mouse button on an icon, drag it to a new position on the bar, and release. This lets you arrange functions in the order you prefer.
Global pause. Suspends automatic operation. The pause key is set in settings; your configuration may use a key other than the default Delete. While paused, normal mouse toggling of functions is blocked and the inspector’s remembered target is cleared. Release the pause to resume operation.
Button states. A gray border means the function is off; a double gold border means it is on. During a global pause, all buttons have a double red border. The icon images retain their colors.


Replacing icons. You can replace the bar’s images with your own. They are stored in the data\Images\SkillPanel folder inside the ZeusR folder. The filename before the extension identifies the function, so keep it unchanged:
| Function | Image name |
|---|---|
| Auto Target | Target |
| Target Inspector | Inspector |
| Auto Assist | Assist |
| Smart Combat | Combat |
| Breaker | Flash |
| Reskill | Reskill |
| Noblesse | Noblesse |
Supported formats are PNG, BMP, JPG, and JPEG. The original image does not need an exact size: ZeusR fits it into the button while preserving its aspect ratio. Square icons work best for a tidy result; PNG supports a transparent background. A larger image does not increase the button’s size.
- Stop ZeusR and save a copy of the original icons in another folder.
- Place the new image in
data\Images\SkillPanel, keeping the required filename before the extension. For example, Auto Target can useTarget.pngorTarget.jpg. - If you change formats, remove the previous file with the same name from this folder. If several versions are present, ZeusR checks them in this order: PNG → BMP → JPG → JPEG, and uses the first one it can load.
- Restart ZeusR to load the new images.
Interface visibility and function states are independent. A hidden bar does not mean its modes are off, and a visible radar does not confirm that automation is running. The main shortcuts are collected in Hotkeys.
Saving settings. Enter a configuration name in the field at the bottom of the settings window and click the save button to its right. To save a separate copy, enter a new name. Save any changes you want to keep before selecting another set: an existing configuration loads as soon as you select it. Closing the window does not save your settings.
Shared sets. The library, ZR Style, and priority profiles are shared: switching the main configuration does not restore their previous versions. Smart Combat has its own “Config” field; the main configuration remembers the selected action set. For details, see enabling and saving Smart Combat.
Automatic Noblesse
This function checks for Noblesse before automatic combat. If enabled and your character has the Noblesse skill, ZeusR first casts it on yourself when the buff is missing, then continues running combat functions.
No Smart Combat setup required. Noblesse already has dedicated logic: you do not need to add an action, specify a buff ID, or set up conditions in Smart Combat. Simply enable the Noblesse button on the function bar. It works independently, including when Smart Combat is off.